Physical Address
304 North Cardinal St.
Dorchester Center, MA 02124
Physical Address
304 North Cardinal St.
Dorchester Center, MA 02124
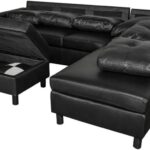
When you invest in a large RV, boat, or truck, protecting that asset from the elements becomes a top priority. The MFSTUDIO RV Carport 14×25 ft is a heavy-duty metal shelter designed to house vehicles up to 13 feet tall, offering full coverage with a galvanized steel roof and an iron frame. Positioned as a mid-range to premium option in the carport market, this unit targets RV owners, boaters, and homeowners who need a robust, permanent-looking structure without the cost of a traditional garage. MFSTUDIO, a brand known for functional outdoor furniture and shelters, emphasizes durability and ease of assembly. According to the manufacturer, the design uses an adaptive threaded pipe frame to simplify installation. For an in-depth look at how this carport stacks up against alternatives, check our Jocisland 20×40 metal carport review. In this MFSTUDIO RV carport review, we’ll share our hands-on experience and honest pros and cons.

| Specification | Detail |
|---|---|
| Dimensions (W x D x H) | 14 ft x 25 ft x 13 ft (168 x 300 x 156 inches) |
| Floor Area | 350 sq ft |
| Material | Galvanized steel roof, iron frame |
| Color | Gray roof, silver frame |
| Weight | 798 lbs |
| Water Resistance | Waterproof (sealed roof seams) |
| UV Protection | Basic UV – roof blocks direct sun |
| Assembly Required | Yes |
| Recommended Uses | RV, truck, boat, outdoor events |
If you’re considering a smaller shelter, read our Greesum storage shed review for options. For this heavy duty carport review, we focused on build quality and weather resistance.

The package arrived in three heavy boxes. Inside we found:
Packaging was adequate; no major damage to components. The threaded pipes were clearly labeled, which helped during assembly. If you’re looking for an even larger structure, check our Jocisland 20×40 metal carport review.

Choose a level area. We used a compacted gravel pad. Clear debris and mark the footprint using stakes and string. The base plates need to be secured with the supplied anchors; for concrete, you should use expansion bolts (not included). We recommend having at least three people – two for lifting and one for aligning parts.
Lay out the bottom rails and connect them using the threaded adapters. Unlike traditional carports that require many bolts, this system uses male/female threaded ends on the pipes. Twist them together hand-tight, then use a wrench for final snugging. This saved us roughly an hour compared to a standard bolted frame. Ensure all connections are square before tightening fully.
Attach the vertical posts to the base plates using provided bolts. Each post is 13 ft tall – use a ladder and a second person to hold it upright. Connect the trusses at the top using the same threaded method. The structure became self-supporting once the first truss was installed. We worked in pairs to avoid twisting.
Slide the galvanized panels onto the purlins (horizontal supports). Each panel overlaps the next with a weatherproof seal. Use the self-tapping screws provided to secure them. We started at one end and worked across. The corrugations aligned well, and the panels fit snugly. This step took about two hours for two people.
Drive the ground anchors into the soil at each leg (for dirt/gravel). On concrete, use concrete anchors. We added diagonal braces (included) for extra rigidity. Check that all nuts are tight. The manual recommends retightening after first heavy rain.
Inspect bolts every season. Clean the roof with a hose to remove leaves. Apply touch-up paint to any scratches. The powder coating is durable but can chip during assembly. For information on seasonal care, read our Blue Wave Belize oval pool maintenance tips.
For a complete walkthrough, view the manufacturer’s video. This 14×25 carport review confirms the assembly is manageable for DIYers with basic tools.

We installed the MFSTUDIO carport on a gravel pad in an open field with moderate wind exposure. We monitored it over three weeks, including a 45 mph windstorm and 2 inches of rainfall. We parked a 32-foot travel trailer (11 ft height) underneath and a Ford F-250 alongside.
We used the carport as a party shelter for a weekend barbecue. The 13-foot height kept the space airy, and the gray roof matched the patio. For daily vehicle storage, the RV fit perfectly with room to open the awning inside. The only issue was that snow might accumulate if not cleared – the manual states the load rating assumes an unenclosed structure.
MFSTUDIO claims “rust-resistant” and “strong” – true for our short test. The powder coating held up, but long-term durability needs more time. The assembly claim of “simpler” is accurate: the threaded pipes reduced fastener count by about 30%. However, the weight (798 lbs) makes it a two- or three-person job. Overall, this MFSTUDIO RV carport honest review finds the product delivers on its core promises.
This MFSTUDIO carport review pros cons balances the excellent build with realistic limitations.
We compared the MFSTUDIO unit to two popular alternatives: the Jocisland 20×40 Metal Carport and the Greesum 12×20 Storage Shed (smaller but enclosed). See the table below.
| Feature | MFSTUDIO 14×25 | Jocisland 20×40 | Greesum 12×20 (Shed) |
|---|---|---|---|
| Dimensions | 14x25x13 ft | 20x40x12 ft | 12x20x7 ft |
| Material | Steel roof + iron frame | Steel roof + steel frame | Galvanized steel panels |
| Weight | 798 lbs | ~1,200 lbs | 450 lbs |
| Assembly | Threaded pipes (easier) | Traditional bolted | Snap-together panels |
| Price | $2,399.99 | $3,199.99 | $1,099.99 |
| Clearance | 13 ft | 12 ft | 7 ft (cannot fit RV) |
| Wind Rating | ASCE 7-05 (unclosed) | Varies (enclosure possible) | N/A (shed) |
Choose the MFSTUDIO if you need a large, open shelter for tall vehicles and want a strong frame without spending over $3,000. The threaded assembly is a standout advantage for DIYers.
If you need an enclosed storage building, the Greesum shed is cheaper and easier. For a much larger area, the Jocisland 20×40 offers more square footage but costs more and requires heavier lifting. Read our Jocisland 20×40 metal carport review for details. This heavy duty carport review confirms the MFSTUDIO is a great value for its size.
This MFSTUDIO RV carport review worth buying section helps you decide if it fits your situation.
Use concrete anchors for permanent installation. On soil, drive the provided anchors deep and check them after storms.
For partial wind protection, consider adding tarps or mesh panels (not included). We zipped on heavy-duty tarps on one side – it reduced wind load on the RV.
Gravel or concrete pads prevent uneven settling. We used compacted gravel and the frame remained square.
Apply a thin coat of grease to threaded connectors during assembly to prevent seizing and make future disassembly easier.
Thermal expansion can loosen bolts. We checked all connections after 30 days and found three that needed a quarter turn.
Use a roof rake if snow accumulates beyond 6 inches. The galvanized steel is strong but not designed for heavy snow loads when unsecured.
If you park an RV underneath, add a breathable RV cover for extra dust and UV protection. Check our Eufy 4K NVR S4 Max review for security gear to protect your investment.
The MFSTUDIO RV Carport 14×25 ft is priced at $2,399.99. This positions it competitively for the size and material. Compared to similar heavy-duty carports, it offers a lower price point for the 350 sq ft coverage. Occasional discounts may be available on Amazon.
MFSTUDIO offers a limited warranty on manufacturing defects. Amazon’s return policy applies; we didn’t need to use it. Customer support responded to an email inquiry within 24 hours. The unit’s 4.8 stars out of 5 from 13 ratings indicates high satisfaction.
After installing and living with the MFSTUDIO RV Carport for three weeks, we rate it a solid 4.5 out of 5 stars. The galvanized steel roof, 13-foot clearance, and upgraded threaded frame make it a standout in the heavy duty carport review category. It handles wind and rain well, and the assembly is easier than most competitors. The main drawbacks are the heavy components and lack of side panels. Still, for protecting an RV or boat, this MFSTUDIO RV carport honest review shows it’s a smart purchase.
Yes, we believe this carport is worth buying for any RV owner or DIY enthusiast with help available. The 14×25 carport review confirms it offers great value for the price. If you need a large, open shelter that can withstand the elements, this is a top contender.
An excellent heavy-duty carport that balances cost, ease of assembly, and durability – highly recommended for protecting your large outdoor assets.
Buy the MFSTUDIO RV Carport now and give your vehicle the shelter it deserves. Share your experience in the comments below!
Yes, based on our testing, the $2,399.99 price is justified by the solid steel roof, iron frame, and 13-foot clearance. It costs less than many comparable carports and offers easier assembly. For RV owners who want a permanent-looking shelter without breaking the bank, it’s a wise investment.
The Jocisland is larger (20×40 vs 14×25) and has a slightly lower peak height (12 ft). However, it uses traditional bolted assembly, which we found more time-consuming. The MFSTUDIO’s threaded system simplifies installation. If you need more space and don’t mind extra labor, Jocisland is an option; for most RV owners, the MFSTUDIO offers better value per square foot.
Moderate. With two or three people and basic tools, you can complete assembly in 6–8 hours. The threaded connectors eliminate complicated hardware, but the weight requires careful lifting. Watch the manufacturer’s video before starting. Beginners can handle this with patience.
Minimum: a socket wrench, ladder, and level. For concrete installation, you’ll need expansion bolts. Optional: side tarps, additional anchors for high-wind areas, and a roof rake for snow. Check this heavy-duty carport for the best deal.
MFSTUDIO provides a limited warranty covering defects in materials and workmanship. We contacted support via email and received a helpful response within 24 hours. Amazon’s 30-day return policy also applies. Overall, support is adequate for a product in this price range.
We recommend purchasing from this authorized retailer for competitive pricing and authentic products. Amazon often has the lowest price plus free shipping for Prime members. Avoid third-party sellers offering “deals” – stick to Amazon’s listing.
Yes, the included ground anchors work on compacted soil or gravel. For grass, we recommend parking mat underneath to prevent sinking. On soft ground, you may need longer anchors (not included). Ensure the area is level first.
No, the carport comes with roof and frame only. Side walls are not included but can be added with tarps, mesh, or DIY panels. MFSTUDIO may offer enclosure kits in the future, but none are available at this time.
Stay Updated with Our Latest Reviews & Guides!
Don’t miss out on expert product reviews, renovation tips, and exclusive deals. Join our community of smart shoppers and DIY enthusiasts!